Pages

Showing posts with label sewing. Show all posts

Sunday, December 2, 2012

recent projects...

Hi All,  I'm still here crafting away.  Here are photos of a few projects I've been working on over the past few weeks.

Scrabble tree Ornaments:


Sewn ombre note cards from scrapbook paper:


Pine cone ornaments from Sweaters:

Camper pillow case & jammies  (Christmas Present for Peepers):


Poinsettia pillow with jingle bells:


Merry Christmas Everyone!!!

Saturday, October 20, 2012

Flannel Scarf

 Do you love to wear a cozy scarf? 
I do & I can't believe it took me years to make one of these lovely scarves!
 Start with 1 old flannel shirt... I think this one was given to be my my BFF Tina in 1989 during my Northern Exposure phase.

Add another flannel shirt...

 And another.
 Cut the back out of your flannel shirt.  Mine ended up being approximately 16" wide x 22" long since these were oversized shirts.  If you shirts are smaller/more fitted, you may need to use 4 shirts to get the length you want.
 Sew the 3 shirt ends together.  Since flannel will fray with wash & wear, I folded over the seam allowance to one side & used zig zag stitch to enclose the raw edges.
 I ended up with one really long scarf (about 65").  At this point I switched gears a bit & decided to sew the scarf in a circle to make an infinity scarf.  If your scarf is shorter than 58", I would not recommend this as you won't be able to easily slip it on & off.
 I hemmed the edges with a simple zig zag stitch again to prevent fraying.
 Super cute scarf!
I really like that I can wear it with different plaids in the front
depending on the other colors I'm wearing.
 I tried it with blue striped dress shirts too...

Skip To My Lou

Thank you, Karla

Thursday, August 9, 2012

Little Boy Plaid Shorts

Have you look at One Yard Wonders and  One Yard Wonders 2?

They are two amazingly fun books with projects galore that take only 1 yard of fabric! All the patters are included in the book.  And one of my former co-workers is the author! Small world huh?

I used a woven pants pattern as inspiration for shorts for Peepers.

I took a few measurements from his "favorite plaid shorts" & tweaked the pattern slightly.

I shortened the inseam to be 5".

I changed the pocket opening shape from curved to angled
 & used self bias fabric to finish it off.
Just as I was ready to sew the fold over elastic waistband, I decided to take a few more measurements from his "favorite plaid shorts" & realized I did not have enough material for a proper fold over waistband.
So I improvised with a leftover piece of chocolate colored knit fabric for a cozy waistband.

Don't look too close at my plaid matching... it is not up to par in my book.


Peepers is jumping for joy to have new plaid shorts!
Karla

Sunday, May 13, 2012

4 Year Fire Helmet Shirt

Another year has passed & I'm sharing with you the shirt I made for Anders 4th (YES, his 4th BIRTHDAY)!
 I'm hooked on reverse appliques, I have made shirts many in the past. 
Here are the links if you want to revisit them...

This year, we are going with a fire truck theme for a party, so I made the shirt to follow suit.  Plus, I secretly hope this will become his "all time favorite shirt" that I need to pry off of him each night to wash to be ready for the next day.

I Googled images until I found one I liked.  This one has considerable more detail than previous tees I've made, So I reversed the image, to try something new...
  I sandwiched the fabric that I want exposed (black) between the reversed image & the wrong side of the shirt & literally sewed right thru the paper.
(my theory was a double negative, will make a positive)

 I then carefully peeled away the paper (this was trickier & took way longer that I thought it would).  I used a slightly smaller stitch length (3) than I normally sew with to try to prevent stitches from breaking while pulling away the paper.
Here is the exterior.  I went over the stitching again for security & because I like a thicker outline of the detail.
 Then I cut away the red... again, with this amount of detail & closeness of stitching lines, it was more challenging than past reverse appliques.
 I used a scrap piece of white knit fabric & Stitch Witchery for the front of the helmet & cheated with an iron on number (of which I stitched down also)
 WARNING:  With this amount of detail & closeness's of stitching lines, there was a spot that ripped :( 
I went back over the outside edge of the helmet with a small zig zag stitch to fix the hole & try to prevent future tears.
Overall, I do love the look of this shirt & so does Peepers!


Thank You
Tip Junkie handmade projects

Saturday, March 3, 2012

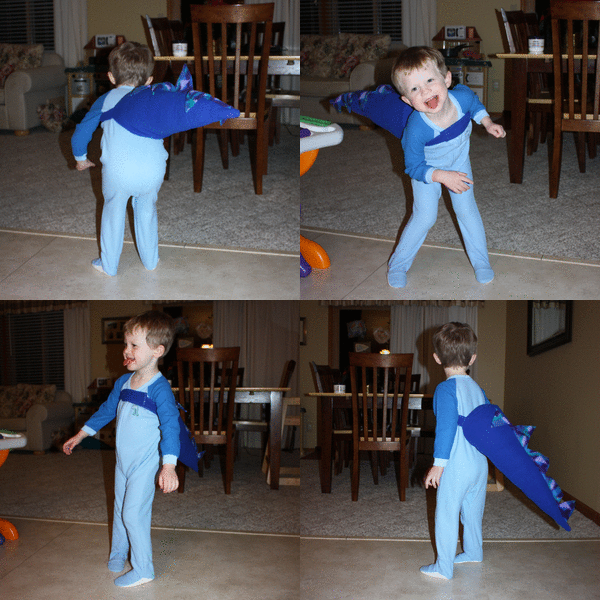
Dino Tail


DINO TAIL PATTERN

I pretty much followed the easy instructions, but used polar fleece as she suggested.  Super fun for Peepers to run around in & shake his tail or fun for a play date (I made 2).


Thanks, Karla

Thursday, February 9, 2012

Kisses 25c - Start Saving Your Quarters

Hi All,  I whipped up this Valentine's shirt this past weekend during the Super Bowl.  Let's face it, since the Packers weren't playing (BOO HOO HOO) I was only half watching it.  So I was  half munching on appetizers and half working on this shirt. 

I had not really planned on making Peepers a Valentine's Shirt this year, but I found a red 3T shirt stashed away (I'm sure I intended on doing something with & just never got around to it).  So I thought I better make something with it & quick before he grows out of it.  I came up with a simple shirt that I knew I already had everything I needed to make it.
  • Striped fabric
  • Silver fabric
  • Cross stitch thread
  • Scissors, thread, needle, pins etc...
I used the  Reverse Applique technique that I have used on many projects. 
 Here is a back view.
 As a last minute addition, I added sleeves to the shirt by just following one of his existing shirts for the size.  I pinned the sleeve on & stitched it to the shirt following the existing hem sleeve.
 I used the psychedelic silver fabric to cut out a coin (I used a spool of thread as my circle template).  I've had the silver fabric in my stash for about 15 years & just knew there would be a need for it someday.
 I free handed the word "KISSES" and used Back Stitch technique and cross stitch thread to hand embroider the word.
 Finished!
 I had to bribe my model for a few photos.


Thank you, Karla

Tuesday, January 10, 2012

Boo Boo Buddy

This weekend I whipped up some Boo Boo Buddies.


Here is the super easy step by step Tutorial for Hot/Cold Pack from Rubber Punkin


Thank you, Karla