Pages

Showing posts with label gifts. Show all posts

Sunday, December 2, 2012

recent projects...

Hi All,  I'm still here crafting away.  Here are photos of a few projects I've been working on over the past few weeks.

Scrabble tree Ornaments:


Sewn ombre note cards from scrapbook paper:


Pine cone ornaments from Sweaters:

Camper pillow case & jammies  (Christmas Present for Peepers):


Poinsettia pillow with jingle bells:


Merry Christmas Everyone!!!

Sunday, September 9, 2012

Sun Catcher

For Grandparents day we made Sun Catchers.  I read about this on-line & thought it would be kind of fun to try.  It is recommended to do it on the grill to avoid the melted plastic fumes in your house.

Place your plastic pony beads in a pattern in a baking dish
(cake pan, muffin pan for littler ones, etc). 
We used cookie cutter to guide our in our shape, but you can do
whatever pattern (or no pattern)

Remove cookie cutter & place on hot grill, wait about 10 minutes (we checked ours every so often to see how well the beads were melting)

Once all beads are melted, take off & allow to cool. 
TIP:  Don't get your grill too hot, I think that is why the first one did not melt into a smooth surface... it was hot enough to boil plastic!
Once cool to the touch, pop in the freezer for a few minutes & the plastic sun catcher will pop right out of the cake pan!
 Then drill a small hole & hang with ribbon.


Other Tips:
1) This did ruin my cake pan even though the on-line instructions said it was OK - if you have an old pan you don't care about - use it!
2) The translucent & opaque Pony beads melted best, I bought some pearlized ones & they melted, but were "clumpy".

Peepers really enjoyed this project & wants to make more fish sun catchers.

Thanks, Karla

Tuesday, April 24, 2012

Scrabble Charm Bracelet

Hi All,

Here is a quick tutorial of the Scrabble Charm Bracelet I made my Mom's Birthday Present.

I had found a Scrabble game a while back as Goodwill  - I was super excited to find it, because there are a number of Scrabble crafts floating around in my head that I wanted to make or use for scrap booking, etc.

Scrabble tiles are 18mm wide X 20 mm tall.

1. Place a piece of masking or painters tape over the tile to protect it from the drill
2. Mark 9mm over & 4mm down for the center of the hole.
3. Drill hole - we (My Husband) carefully drilled a pilot hole & then used a slightly larger drill bit for the finished hole.  The finished hole measured approx 2mm in diameter. 

***We practiced on the "X" first - I didn't want to risk any precious letters :)
 You can simply add a jump ring here & you are ready to wear OR ...
You can add a photo/picture to the back.

4. I printed out photos of Mom's 3 grandkids at 15mm X 15mm
5. Mod Podge the photo to the back of the Scrabble tile - let dry a few hours
6. Added a thin layer of Diamond Glaze over the photo - let dry over night
7. Add jump ring & wear
 ***While the Mod Podge & Diamond Glaze are wet, I used  needle to make sure the hole was not clogged


HAPPY BIRTHDAY MOM!
Love, Karla

Skip To My Lou

Saturday, March 3, 2012

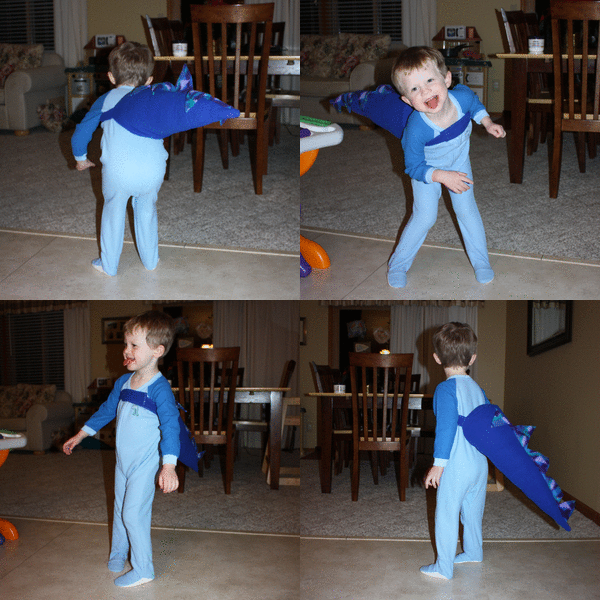
Dino Tail


DINO TAIL PATTERN

I pretty much followed the easy instructions, but used polar fleece as she suggested.  Super fun for Peepers to run around in & shake his tail or fun for a play date (I made 2).


Thanks, Karla

Saturday, January 28, 2012

White Forest


A few weeks ago, I posted an inspiration photo of some
sweater trees that I wanted to make from Betz White


Here is the finished product.  I made 3 cream colored trees to use in my "Winter Decor" that I put up in November & take down in April. 
I absolutely adore them!


Thanks, Karla

Tuesday, December 13, 2011

Spiderman Christmas Ornament

Every year I make Peepers a ornament for Christmas.
His First Christmas I used Fimo clay & made a hand print ornament. I'm no Fimo expert... In fact this was the only time I've ever used it... so here is a TIP I'll share with you... to soften the Fimo clay up enough to work with it, I put it in a zip lock bag & stuck it on the front pocket of my pants while I went on with my day. My body heat warmed the clay up & made it easy to work with.
His Second Christmas I made a Photo Block ornament.
His Third Christmas I made a Birch Branch Photo ornament.
This year, while we were decorating the little tree for his bedroom, he requested a "Spiderman Tree".
In trying to surprise him , I thought I would at least get him a Spiderman ornament from Santa for next year. I was very disappointed with the selection for a 3 yr old (or any age for that matter). There were hand blown glass ones (NO THANK YOU) or nice resin ones that were $15.oo (Also NO THANK YOU).

So out of necessity, I had to come up with a home made Spiderman Ornament (actually semi homemade, but it still counts in my book).
You'll need:

a pre-made non-shatter proof ornament - I got this one at Target. I like the shape of it (kind of like an M&M) & thought it would be easy to add my idea to the back of the ornament.
Photo of Spiderman (or icon of your choice). I just googled some images & scaled them to be smaller that the ornament
Scissors or Exacto knife
marker - I used a sharpie
Mod Podge - I used Glitter Mod Podge... it is a Christmas ornament after all!
Brush
.

First I drew on a spiderweb with the marker - I also added his name & year


Then I cut out Spiderman using the scissors & Exacto knife for the small detail.

Lastly, Mod Podge Spiderman on the ornament & let dry.
Super simple & only $2.00


I do have some ideas for next year if he still wants a Christmas tree decorated entirely in Spiderman. We'll see...


Thanks for checking in, Karla

Sunday, December 4, 2011

Holiday Ideas to get the juices flowing

Card Board Tube Ornaments over at Don't bother me, I'm Reading


Button Snowmen & Santa’s at Rubies & Pearls


Melted Snow Man at Flexible Dreams


Felt Candy Cane Garland at PurlBee


Sweater Tree by Betz White


Felt Pine cones by Betz White


Yarn Wrapped Star at Live Laugh Rowe


Also there is a collection of 20 Holiday Ideas at Tater Tots & Jello


and Crazy Christmas Crafters at I heart Nap Time


Enjoy!

Tuesday, June 21, 2011

Hooded Towel

We stared swim lessons last week & I realized we (the boy) needs a hooded swim towel. We have one for bath time, but need something fun to wrap him up to be my "Baby Burrito". We loved the hooded towels as a baby & they still work out great for us, we just need more.

You'll need one large towel & 2 wash cloths. Target has some wonderful towels colors... I had a hard time choosing, but settled on this beach blue.With right sides together, sew 2 sides of the wash cloths together.
This makes your hood

Find the center of the long side of the towel, line up the center back of the hood with the center of the towel.

Pin & stitch the hood on the towel.
A little added feature: take a few inches of ribbon & sew a loop at the center back of the towel to hang up on a hook.


Stitch down the seam allowance at the top of the hood & where the hood joins the towel.

TA DA... a few simple seams and about 15 minutes & you have a cute hooded towel.


I made a few...
in fun colors.

Last year, I made Peepers a hooded towel for bathtime - I tricked this one up a bit... with just a few simple steps.

After you have made the hooded towel, use a dinner plate as a guideline for rounding the top edge of the towel. This just makes appling the binding easier. I used 1 pkg of contrast binding (the really wide stuff) to bind the edge of the hood & towel.
I them used scrap fabric to monogram the towel. There are tons of cute applique ideas (shark, star fish, waves, race car, flowers or fruit) or you could make fun animal ears on the hood.


Thanks, Karla